

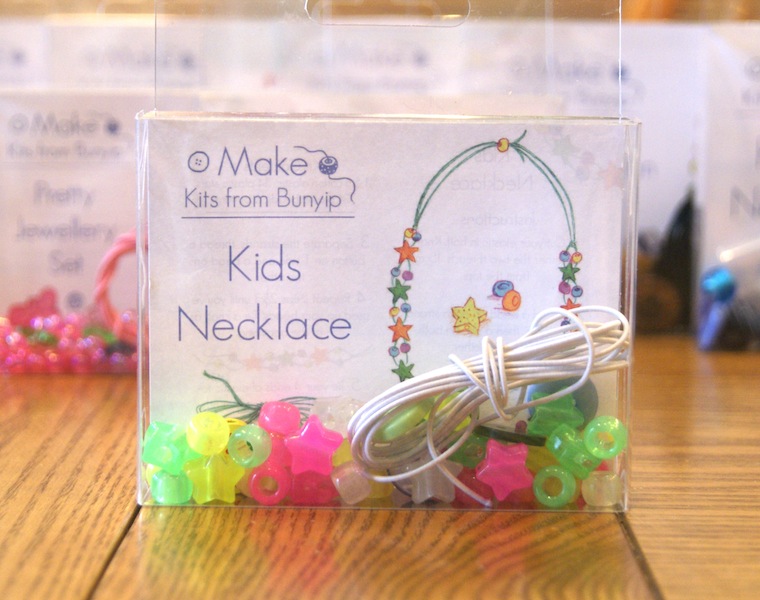
How to make a Knotty Necklace


Now that The Contemporary Craft Festival is over, I can finally get around to writing about my May Challenge (yes I’m aware that it’s now the middle of June!). I challenged myself to sew with stretch fabrics for this month as I’d never done it before and I actually really enjoyed it. I’ve always heard horror stories about how hard jersey is to sew with but I didn’t have any issues and would definitely recommend it to anyone who is feeling a bit nervous about it.
I decided to start by making the Joni Dress which is in the Tilly and the Buttons Stretch book. I used a relatively cheap fabric so it was quite thin and very stretchy. I realised that I’d have to do things differently to when I sew with woven fabrics when I tried to fold the fabric and got all of this puckering. No way was it going to be possible to cut accurately with scissors so I decided to use my rotary cutter and do pieces that were on the fold individually. I have no idea why I don’t always use a rotary cutter! It is so much easier; I’ll definitely be using it for all of my cutting in the future and it was perfect for this jersey.

Before I started sewing, I changed my needle to one specifically for stretch materials, changed my stitch to a zig-zag and kept my regular sewing foot; so easy so far. The first instruction was to attach clear elastic to the waist and shoulder seams which stops them from stretching out after wearing the dress a few times.
Now the real perk to sewing with stretch fabrics is that sleeves are a doddle! Everything can be stretched in to place perfectly. I inserted the sleeve ‘on the flat’ which was so easy and all I had to do was match up the notches and then sew up the sides of the sleeve and bodice. I’m pleased with the finished dress but I’ll definitely be making it in a slightly sturdier fabric next time.

This was the first month when I decided to make two items for my monthly challenge! As I was flicking through the book, I came across the Stella Hoodie and decided to give that a go as well (not that I ever do anything even remotely active…). I bought some lovely teal sweatshirt fabric and matching lining and jumped straight in. I actually managed to make most of this in one evening from cutting out to being able to wear it. The only thing left to do is the hem at the bottom as I didn’t have a twin needle suitable for stretch fabrics.


Most of the hoodie was really straight forward, the only thing that was slightly different was having to stabilise the buttonhole so that it didn’t pull out of shape. Again, the sleeves were easy peezy and even the cuffs worked well. So now all that’s left is to take up a sport …
I have learnt one thing from my February challenge… I do NOT enjoy setting in sleeves. It’s hard and time consuming and I’m pretty sure I still haven’t cracked it (Rome wasn’t built in a day and all that). Sadly this won’t be a tutorial that you can follow to get the perfect sleeve but at least you can share in the experience…
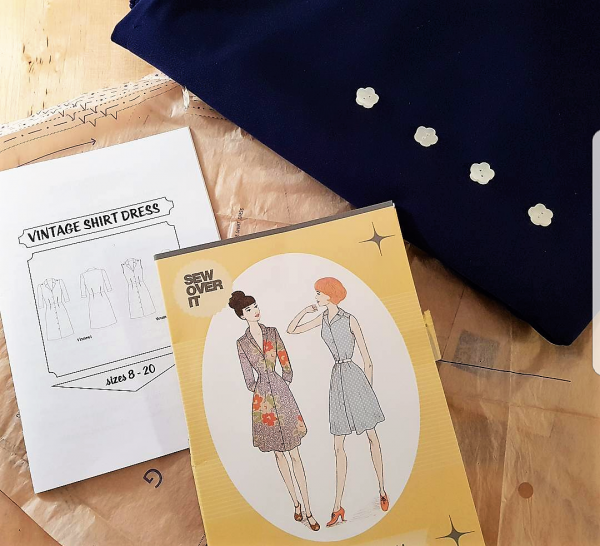
I did A LOT of research for the February challenge. In fact, most of my work for the month was just reading stuff (if you are interested take a look at Tilly’s advice for creating a gathered sleeve) and begging for advice from the Sewing Challenge Facebook group. I decided I did actually need to produce something though and that something was going to be the Sew Over It Vintage Shirt Dress.
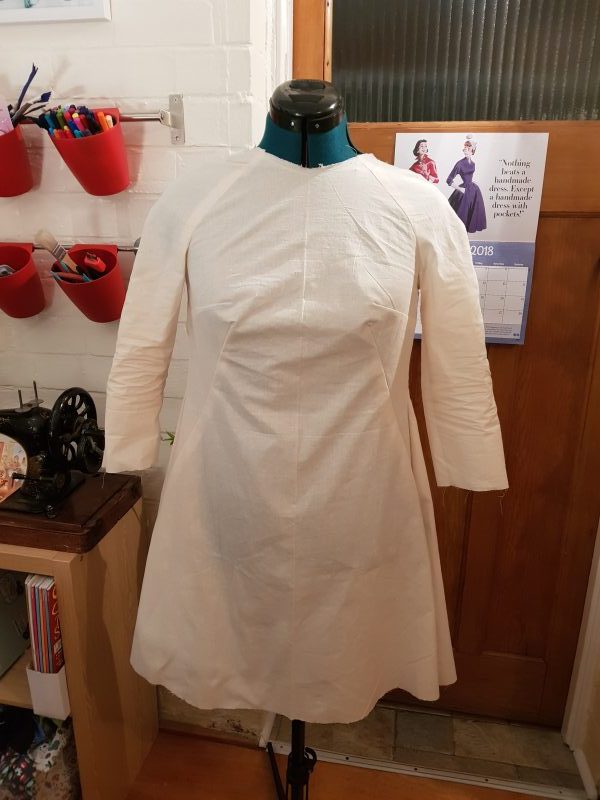
I decided to do my first attempt on calico so it didn’t matter if it went wrong. I adjusted my stitch length to the longest it would go and did my two lines of stitches which I would technically use to create my gathers. I then pulled the threads to gather the sleeve and spread it out so that it wasn’t too bunched up. I think in the future it’d be good to use a different coloured thread for the bobbin so I can see which one needs to be pulled. To get to this stage took a long time and I used my knee to try and manipulate the shape!


After a lot of procrastinating, I moved on to my actual fabric. Just to keep me on my toes, I decided to use a nice slippery and slightly stretchy fabric… After cutting, overlocking and creating a mock turn-up cuff, I proceeded to spend a huge amount of my time trying to get the over-sized sleeve to fit into the smaller sleeve hole while using all of my pins to do so. At one point I really did question if I actually needed to have movement for my shoulders.


The first picture was my first attempt. Note those tucks at the top there… they were not part of the pattern. I huffed, puffed, swore a bit and shut the dress away for the night. With a fresh head and a more objective pair of eyes, I looked at the dress again and realised that actually, they were to wide for my shoulders. By pure chance, that meant that I needed to increase the seam allowance at the top of the sleeve, thus hiding the tucks. Hurrah for my abnormally shaped shoulders!


So despite bodging it a bit… I managed to finish the dress (while learning lots of other skills along the way). I may avoid setting in sleeves like the plague in the future but I have a dress that shows that, one time, I did it (half) successfully.


So often, in the past, I’ve dived straight in to a project only to finish it and find it doesn’t fit me properly. It does make perfect sense, we’re never all going to be the exact size of the pattern; there’ll always be the odd thing that needs a tweak. This month I wanted to remedy this by practising adjusting patterns and in particular making a toile.
What on earth is a toile you ask!
It’s basically an early version of a pattern made up of cheap fabric so that sizing adjustments can be made without ruining beautiful fabric. You’d use a fabric that is similar to what you’ll use for the final piece and trace any changes to make a perfect pattern. I’ve always put it off in the past because it seems counterproductive to pre-make a garment when you have no intention of wearing it. But my 2018 challenge is to do things that I don’t usually do so here it goes.
I bought some really beautiful fabric a while ago but had been putting off making with it because the thought of ruining it terrified me! So it seemed like the perfect time to make a toile so that I could check the fit.
This is my finished toile which I also tried on myself and pranced around in to check movement of course. It turned out that the fit was pretty good. I have fairly standard measurements apparently so I didn’t need to adjust the bust which is often the main problem area.


One thing I did decide to change was the sleeve. On the long sleeve, little creases appeared quite quickly around the elbow; I don’t like ironing so this wouldn’t do at all. I took off the sleeve on my toile and traced it onto paper, making sure that I included all the markings from the original pattern.
So overall a great success and I had the confidence to cut in to my beautiful fabric knowing that the fit would be good.

Just the one toile was not enough though; I wanted a challenge. This time I decided to make one for a pair of fitted trousers and boy am I glad I did. The fit of my toile was all wrong and didn’t lay properly near the ankles. So with a little bit of a helping hand I pinned in the areas that needed pulling in and marked the changes with a pen. I then took everything apart and this time, used the toile as my pattern piece. I used carbon paper and a tracing wheel to transfer the markings on to my trousers fabric (polka dot trousers anyone?).


So, making a toile IS extra effort and I wouldn’t do it for everything but it is a great way to get a good fit and to eliminate the fear of ruining fabric.

You may have noticed (because we keep talking about it) that we’re really trying to up our making game in 2017 and my last blog post was all about making up Mattie’s Rob Ryan Clothkits skirt, which we thoroughly enjoyed.

This week I decided to pop open one of the Kimono Clothkits paper patterns that we sell and give that one a go, since it’s been my favourite since they arrived on our doorstep. What follows is part review, part nonsense – enjoy!
One of the main reasons Mattie and I get so reluctant to make anything is that we don’t like using up the beautiful stock that could be sold to someone etc etc, but since we’re trying to go against this instinct I boldly decided to use our most delicious fabric to make this kimono. In for a penny, in for a pound and that.

We call this our William Morris fabric, for obvious reasons, and it does sell at a rather exciting £20 a metre. But, and I know I would say this, it is 100% worth it – it’s the most beautiful colour in real life (we have a yellow version too!) and it’s amazingly light and soft and it just makes me all gooey, ok?
First things first, I traced the pattern out in a size small, basically because I was thrilled to make something in a size small and not have to even worry about it fitting (because it’s a kimono and clearly very loose in all sizes).

This is issue no.1 – I am not a perfectionist and so even while tracing things I get distracted and end up with real wiggly lines that I try to even out during cutting but never really managed to overcome. Important note: this made absolutely no difference to the finished kimono so there.

There’s 3 main pieces, plus 3 facing pieces. It said that the pattern wasn’t suitable for any fabric smaller than 115cm, but this one is 110cm and was fine…I assume because I made it in the smaller size.

Sewing this was pretty straightforward until the facings got involved. You do have to finish a lot of raw edges, and since we’re all still scared of the overlocker (it has blades! run away) I did a standard zig zag stitch…to be honest this was the downside of this make – I got super bored of doing zig zag stitch. It’s necessary but my god it’s dull.

Here’s the facing fun. This forced me to do a lot of standing still, staring at it, sticking my tongue out all deep in thought. I think if I’d cut my pattern/fabric out really neatly this wouldn’t have been so confusing for me but you live and you learn. Basically there were two ways these could have been sewn together and neither way looked like the picture in the instructions so I gambled and just went with one. Luckily it seemed to work out ok so I didn’t really even learn a lesson here.

Sewing the facing to the main piece was v tricky and I did purposeful slow sewing. Once that was done and all ironed to within an inch of its life, you have to top stitch basically all edges of the kimono, which again made me all nervous and sensible for a while.
And here’s the finished piece!

Conclusion: I loved making this, mainly because my eyes got to gaze upon this fabric for a whole day. It was pretty straightforward, but the same as with the skirt pattern I did feel that a certain amount of prior knowledge is assumed even though they’re aimed at beginner’s. It’s nothing you couldn’t figure out with a friend/the internet though.
Thank you for reading this! Hang out with us on facebook, twitter and instagram for first peek at our next make.

One of my favourite things about January, a month with a pretty bad rep, is that everything feels new and fresh. It’s a time for cleansing, reevaluating and figuring out where to start now, especially after being Christmas centric for about 3 months.
Our Bunyip new years resolution for 2017 is to make more, not something you’d think we’d generally be behind on but it’s surprising how much our day to day shop lives can leave us with little time to actually be creative! So this year we’re changing that, allowing ourselves more time to do what we love and take time to put our inspiration into action. This blog is a little look at all the wonderful things we’re feeling motivated by, and the beautiful trends we can’t wait to take ahold of our making in the next few months….enjoy!
Greenery

So Pantone’s colour of the year is Greenery, news to which I think I made a dissatisfied grunt about the first time I heard it. However, being the easily influenced person I am, I am already starting to pursue a bit more of this shade into my everyday life & making. You can see the connections between this and the ever growing enthusiasm for plants – I can barely scroll through instagram without seeing many a beautiful botanical scene.

I had a wonderful time picking out all our green beads and buttons for a magazine project recently, and Mattie’s been working on a fern necklace that’s got us all pretty joyful…

Embroidery
This is one of those trends that’s almost left the runway shows now but is continuing to dominate the high street. I’ve taken one of our botanical embroidery books home with me so that I can spend my Sunday’s in bed stitching mini cacti on to a plain t-shirt I picked up – so satisfying and really eliminates my Netflix binge guilt.

Once I’ve finished this project I’d love to start embroidering something sheer, like these ridiculously beautiful dresses that would maybe not look as amazing on a normal human but still make me really gleeful to gaze upon. We’ve recently ordered in a lot more sequins to the shop, so I’m hoping to start using more of these alongside our tiny shiny beads to embellish shirt collars, etc.

Mattie grabbed a plain sweatshirt recently that she’s planning to embroider geometric shapes & patterns on to – I can’t wait to see!
Tulle

Wearing mid length flowing tulle skirts makes me feel so happy and glam and I can’t wait for more of that in 2017. We’ve only recently added tulle to our fabric selection in store and immensely enjoyed making up a no-sew tutu for the window by knotting long strips around a piece of elastic. We’re moving on to proper tutus next and I’d love to really embellish a long sheer skirt…maybe I could adorn it with green beads and combine all these lovely trends into one really intense garment? Yes please.
Thanks for reading! For more crafty beauty and nonsense join us on Facebook, Twitter & Instagram!