Posted on

Project of the Month: Embroider a Rainbow Hoop

You will need (For our size project – you can obviously go much bigger if you’d like!)

Materials:

5” Embroidery Hoop Piece of plain fabric 20cm x 20cm

(we’ve used white but could look great with a sky blue!)

Piece of Felt 20cm x 20cm

X6 Different colours of embroidery thread

Tools and Equipment:

Embroidery needle, sharp scissors, Tailors chalk / erasable pen,

Fabric Scissors

Let’s get Making!

Press your fabric into your hoop – make sure it’s nice and tight a bit like a drum!

Draw on your rainbow *Top Tip!* Find a rainbow shape on your laptop or computer, whack the brightness up and lay your fabric over the screen. Trace the rainbow onto your fabric!

Measure out our thread to 50cm, then split your thread in half so you’re using 3 of the inner threads at a time – makes for easier stitching into fabrics and make your thread last twice as long!

We’re using our colours in this order (from outside to inside) Red, Orange, Yellow, Green, Blue, Purple but feel free to mix things up and make it even more colourful! Also using a different stitch for each line of the rainbow, however you could always use the same stitch for each or 

  1. The Red line – chain stitch.
  2. Orange – Couching
  3. Yellow – Running Stitch
  4. Green – Stem Stitch
  5. Blue – Back Stitch
  6. Purple – French Knots

Now to neaten up the edges of your fabric. Keeping your fabric in it’s hoop (You may want to pop it out and then re-stretch it so it’s nice and tight again) cut your fabric into a circle roughly 1 inch larger than your hoop. Grab a needle and thread and do a large running stitch around the edge of the circle (not too close to the edge about 5mm from the edge. When you get back round to the beginning of your running stitch pull your thread and it will gather the fabric to the back of your hoop! Knot in place.

Next grab your felt and cut it into a circle slightly smaller than your hoop – an easy way to do this is to draw around the hoop onto your felt and then cut it inside of the drawn line.

Either Glue or stitch your felt onto the back side of the hoop.

There you have it! Please let us know how you got on with this project and if you share on social media tag us in with #bunyippotm so we can see them!

If you’re unsure of any of the stitches keep an eye out for another blog post coming.

Posted on

Project of the Month: Quilted Potholder

You will need:Materials:
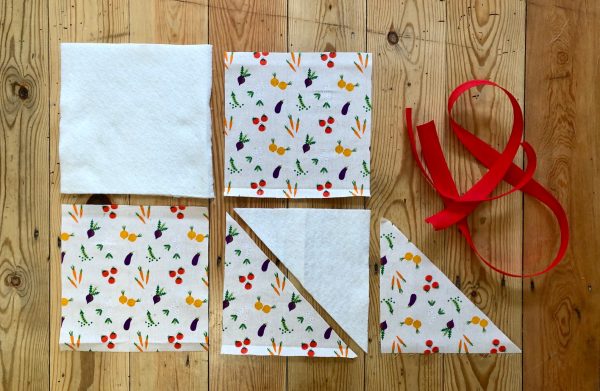
X1 Piece of fabric 60cm x 20cm
X1 Piece of batting (If it’s a think batting then double up)
X1 150cm piece of bias binding
Tools and Equipment:
Matching Thread to your bias binding, Pins, Needle, Fabric Scissors,
Ruler, Pen / Tailors Chalk, optional embroidery thread for hand quilting.
Iron and Ironing board, Sewing Machine,
Let’s get Making!

Cut your fabric into x2 20cm Squares, then with you remaining fabric cut diagonally so you have a triangle. Then do the exact same with you batting.

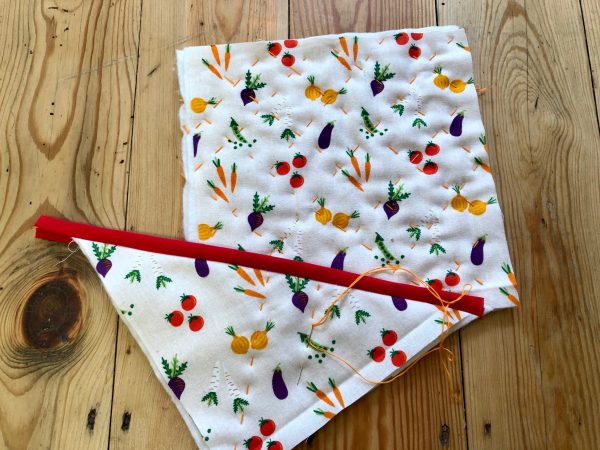
Working with your triangles sandwich together your fabric and batting. One triangle right side of fabric facing down, piece of batting triangle of fabric right side of fabric facing up, pin in place. Grab your bias binding, press in half with an iron and then fold over the raw edges – the long diagonal edge. Stitch on the sewing machine. – Or for a neater version check out our instagram stories for more detailed images!

Do the same sandwich pattern again with your square – Right side of fabric facing down, batting, right side of fabric facing up. Pin in place. You now have the option of quilting the layers together, either by hand of machine – if your wadding is quite thick perhaps go for hand quilting, a simple running stitch in a spiral would be plenty. Or criss cross squares on the sewing machine.

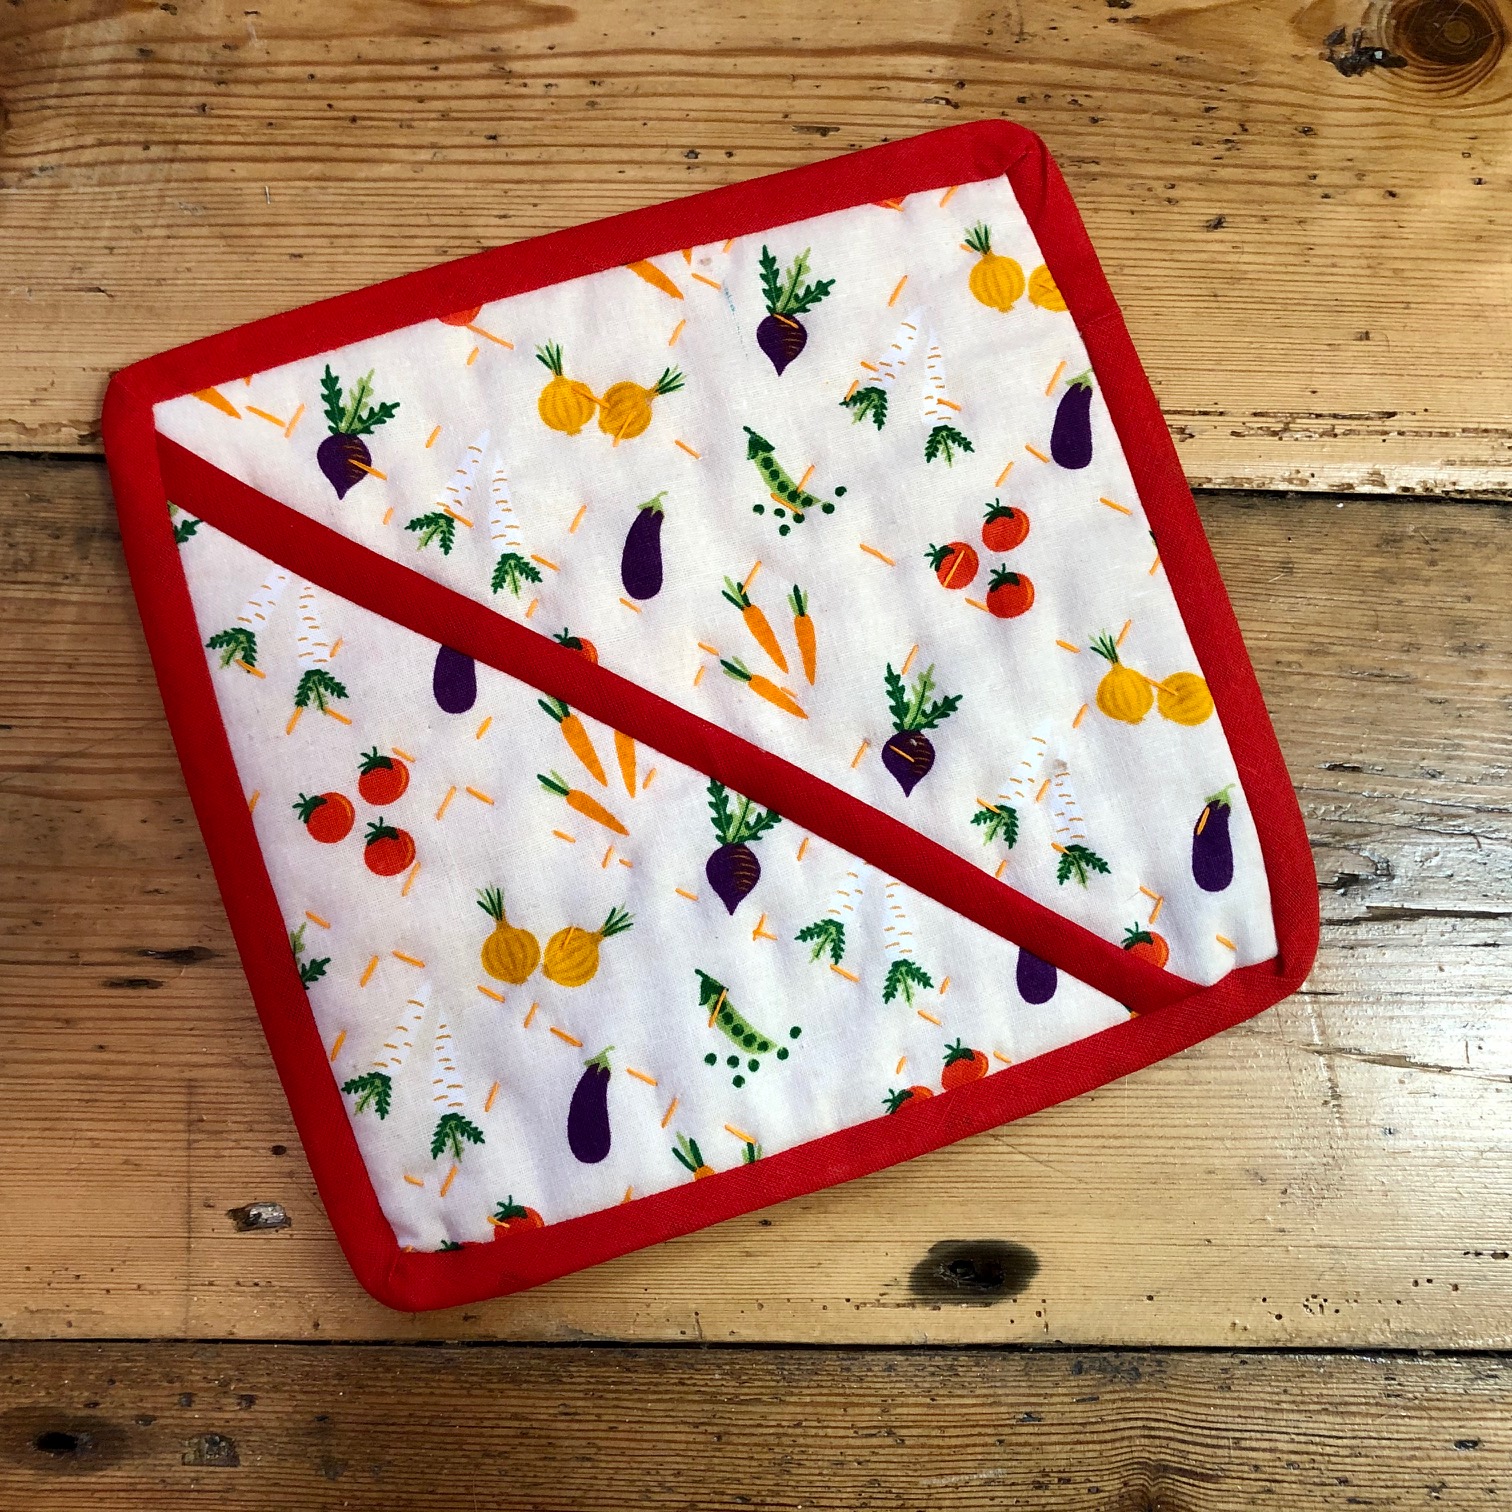
Now place your triangle on top of your square and pin in place. Next fold your bias binding around the raw edge of the square also catching in the edges of the triangle and stitch all together.

You should have a bit of bis binding leftover to make an optional hoop to stitch onto one of the corners for hanging your pot holder and Volia!

There you have it! Please let us know how you got on with this project and if you share on social media tag us in with #bunyippotm so we can see them!

Posted on

What would I do without you?

It’s been 2 weeks since Bunyip had its light fingered visitor, and that awful feeling that I’d really messed it up this time washed over me and I felt the weight of the world on my shoulders.

So much has happened since, so many emotions, and November has run away and it’ll soon be Christmas and life isn’t going to let up so I thought it best to get something written now to catch you all up on the story.

Firstly I still feel a bit stupid about the whole thing. I know I should have been more careful but a working woman needs coffee. It feels wrong that I let my guard down for 1 minute, switched off, get distracted in the middle of a task and I’m punished for it. I still feel like having a trantrum and stamping my feet and shouting IT’S NOT FAIR at the top of my lungs. Most of you are aware of the journey Bunyip has had over the last 12 months or so. It’s not been easy, but of course you just keep your chin up, smile and keep going.

I didn’t really want to publicise what happened but I also didn’t want people to hear through the rumour mill  or wonder why I was in such a state and I think I made the right decision.

The whole social media sharing thing isn’t natural for me but I am so glad I let people know. It was a real eye-opener that people actually want to know what you’re going through, and I feel blessed by the reaction of my friends, customers, fellow traders, the City, the retail community and the wider crafting community. I’ve cried tears of frustration, joy, gratitude and relief. I’ve cried for no reason what-so-ever. I’ve been spending evenings reading through all your kind words, and incredible generosity. I’ve had cake, craft courses, earrings and vegetables thrust into my hands with such conviction I had no choice to accept – which is harder than you think! I’ve had people visiting the shop everyday and its been wonderful to see you all. I’ve had the 2 best weeks in this shop and on the website. It’s completely blown me away.

The Police have CCTV of the culprit entering and leaving the shop, but have been unable to find the cash box having followed his path after he left here, I’m waiting to hear if they have an clear shots of his face so we can try to identify him. The insurance claim is in and I’m crossing my fingers that they will accept my claim.

Your reaction has galvanised me to carry on and look forward with renewed hope for next year and the years after that. I’ve always seen Bunyip as a family business. Not just my family (although look out for Esme’s Scrunchy Business coming soon!) but the wider Exeter and Devon community of people who just love to make.

So THANK YOU, thank you thank you for your likes, your shares, your purchases, your hugs, your veg, your shoulders to cry on, your lovely comments, your wave of messages, your bags full of orders, and your love.

Mattie xx

Posted on

Exploring Cornwall – St Ives


St Ives is a haven for any crafter, artist or independant shop lover! With all the street of St Ives being full of beautiful little shops there’s something for everyone.
First found was Lilac and Lime on Tregenna Place, if you like brightly coloured clothing this is the place for you! It drew me in with the mustard corduroy dungarees covered in bees in the doorway and I ended my two day trip with buying a pair. I could’ve easily bought a dinosaur print dress as well but had to restrain myself to just one item of clothing to fit in my backpack on the train home. Full of Shirts, dungarees, T-Shirts and dresses it’s well worth a look!

Another firm favourite is Poppy Treffry. I’ve been a fan of this brand for years and always make sure to have a nose whenever I’m in St Ives. Poppy Treffry is the queen of free machine embroidery, she doesn’t do all the making any more – they’re too popular! But has a team of Cornish makers to embroider, make and sell all of her designs. There’s a range of brilliant gifts for anyone including yourself of make up bags, tea towels, handbags, purses and many more!

Then there were toy shops, cheese and pasty shops, plenty of seafood related restaurants and pubs all craving for a view of the harbour.

Then the best new find was The Sloop Studios. A collection of studios mixed with gift shops buying direct from the designer / maker themselves! From lino printing, ceramics and glass work there’s loads to look at even if like me you didn’t stumble upon it till 5pm and there were all closed, luckily it’s like an open courtyard so you can still peer through the window even if nobodies in!
This was just to name a few beautiful independants but there are of course so many more and quaint little cobbled streets that can make for a photographers (or any budding Instragrammer!) Dream! – Alice